1 (edited by Shiru 2017-02-11 09:18:57)

Topic: Octode on Arduino

Alright, I needed some place to start with exploring the possibilities of the Arudino and AVR MCUs application to the beeper music, and after some thoughts chose to start from the simplest thing possible - recreating the original Octode engine for Arudino Uno, in C. A very special kind of fun, should I say.

The engine port is nothing special. I decided to stick to the 8-bit counters, and kept the same sample rate as the original to avoid changes in the note range, so it has the same sound quality. I didn't use the Arduino hardware PWM stuff, although it can be done quite easily, and I think it may give some good improvements. The clicky drums algorithm is not 100% match to the original, but sounds more or less along the same lines.


The issues I've had with this small project were mostly related to the Arduino platform itself, not programming. I admit and appreciate its convinience for rapid prototyping, and use it time to time, but don't really enjoy it, because somehow it always full of really weird issues on my side, with no real solution to be found anywhere. For one, I can't just upload a sketch to any of the boards I have (a few different kinds), as it constantly fails with all kind of error messages. Attempting to do that a few times in row, maybe a few tens of times even, solves the problem, eventually sketch will upload successfully. Randomly mashing the Arduino reset button during this increases chances of luck. Another issue is that while Arduino is connected to the PC, it often happens that it starts to constantly reset on its own every ten seconds or so, at random times. So sometimes it is hard to tell whether the sketch code has issues, or it is just Arduino feels funky. Luckily, powering it from a stand alone 5V source makes it work stable.


Code wise, some other issues came from the fact that C compiler is more high level than assembly. Of course I could just write sound generation parts in assembly code, but I wanted to stick to C in order to make the thing more accessible for beginners, hoping that someone may eventually get interested in making 1-bit stuff with Arduino and will need simple examples to learn on them.

It is difficult (haven't found an easy way yet) to see the assembly output of the C compiler in Arduino environment, and it may eventually change after some compiler updates anyway, so consciously designed timed code is pretty much out of question, although it is possible to make something like that with a good deal of guess work and measurements. A more reliable way to go is to use the timer-driven interrupts that can fire up as often as a few tens to a hundred KHz, and in case when different pulse width is needed the hardware PWM unit should be utilized. This makes Music Box-like pulse interleaving and Fuzz Click-like PWM/PFM engines difficult to implement - something is possible, but inconvinient under these circumstances. That's why I chose Octode, as it only have one sample output per loop.

There is a way to guesstimate how much CPU time a code piece takes without extra tools or profiling, by compiling the code, remembering how many bytes it takes, then deleting a line, compiling again, and comparing the sizes. Almost all but few AVR opcodes are two bytes long, and mostly take 1-2 cycles, sometimes 3. So, guessing that average opcode timing is 1.5 cycles, the size difference multiplied by about .75 should give a rough idea. Could be useful to plan how to not exceed the time available in the timer interrupt, which is for this engine port is about 16000000/12727=1257 cycles (Arduino clock divided by sample rate).


Another inconvinience in porting from assembly code to C is that code in beeper engines very often relies to the carry flag. Like, in assembly code you can simply increment or add to a register, and execute extra code only if the result exceeded the register capacity, with the result value wrapping around properly by itself. There is no way in C to mimic that with equal efficiency, without increasing width of a variable by a byte or adding more conditions. For one, when you add a value to variable and want to detect carry, it may look something like this:

n=counter+value;
if(n<counter) { /* carry will happen, new counter value in n */ }
counter=n;

Shifting out a bit out of a register also takes extra code or rethinking the algorithm, like remembering the bit before shift. This makes already not very efficient compiled C code to bloat further. Luckily, Arduino seem to have enough power to run C ports of any ZX Spectrum beeper engine, written in C as efficient as it gets with straight rewrite, but to make more advanced ones in C some common code tricks and general design ideas likely going to be developed.


To convert music data I modified my recently written, specifically for this project, Python port of the XM to Octode converter. For simplisity reason data format remained the same as in the original Octode, although Arduino has enough power to allow much more efficient format with packing. Can't recall who and when (~2011) gave me the XM file of the song I'm using for testing, Mister Beep I guess? Not publishing the source module just in case.

There was an issue with putting ~16K of music data into the memory. By default Arduino copies all arrays and variables into the RAM, even large constant ones. That's because of the AVR's Harvard architecture, with separate memory systems for code (Flash ROM) and data (RAM). Compiler is simply not aware of possibility to put data into program memory. There is a way (different between Arduino IDE versions) to mark arrays and variables with attribute so compiler will put them into program memory. However, this data can't be just accessed by a pointer. Special functions has to be used instead. In AVR assembly code it is similar, but easier and efficient, just another opcode to load from program memory.


Overall player architecture is very simple.

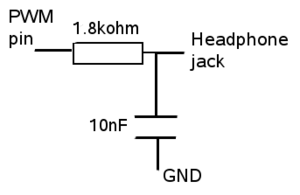
There is a timer interrupt that calls its handler at sample rate (12727 Hz), that's basically sound synthesis part. Handler outputs last calculated output bit to the speaker pin (Port D, bit 7 by default) before of all, to avoid jitter. Then it checks whether the synth is in tone or clicky drums mode. For tone mode it calculates all eight counters just like the original Octode does. I used unrolled code there both for speed and clarity. Constant array indexes seemingly not affecting the code size or speed. For clicky drums mode it calculates a bit for percussive timbre using a set of counters, which is a bit different to the algorithm used in the original Octode. The handler keeps track of the drums mode with a counter. When player needs to play a drum, it simply sets the counter, and while counter ticks down each handler call, drum mode is active. This allows to avoid the need of tempo compensation, drums cause no tempo fluctuation, and can have any reasonable duration. Interrupt handler also decrements another, 16-bit counter until it gets zero. This counter is used to keep sync with the player.

Song data parsing and playing happens in the main thread. Once a row is parsed, player sets the sync counter to the speed value, counted in sample rate units. Then it just waits until the interrupt handler will decrement it down to zero, and next row gets processed. One major weird issue I had was related to this part. Initially I waited for the counter to be zero with just while(counter);. This caused major tempo fluctuations, with both speed increase and decrease. Once I changed it to while(counter) delay(1); it started to work, although the 1 ms delay may change the tempo a bit. Still not figured why the original approach didn't work as expected.


Sorry, no sound example yet, I need to set up a way to record it directly, with proper quality. At the moment I'm using an old transistor radio as an amplifier with speaker for testing.

Post's attachments

arduino_octode.zip 10.05 kb, 65 downloads since 2017-02-11 

You don't have the permssions to download the attachments of this post.
website - 1bit music - other music - youtube - bandcamp - patreon - twitter (latest news there)

Re: Octode on Arduino

Wow, I wouldn't have thought that it's possible to pull this off in C at all. I personally have no interest in programming this thing in C considering the beauty of the AVR m'code instruction set, but still, nice to see it works and is efficient enough.

Regarding the point you mentioned about the while loop, have you checked how the compiler implements this? It should be possible to get the resulting asm code somehow. Afaik the Arduino thing runs on AVR-GCC, so I suppose you could run the code directly through AVR-GCC with -S switch to get the asm output.

I think your stability issues will be related to your PC's USB port. Many PCs have their USB ports improperly configured and/or use crap controllers, which causes them to deliver unstable/out-of-spec current. Since you say that things are fine when running the board off external power, I'm pretty sure that's what's happening here.

3 (edited by Shiru 2017-02-11 18:29:27)

Re: Octode on Arduino

That's the problem, there is no easy way to see the assembly code output. People on forums mostly recommend to use a disassembler. I decided to not bother with it for start, although to get more interesting things done in C it surely will be needed, so I will have to figure it out later.

I love the AVR assembly too, and sure would prefer it over C/Arduino for this kind of projects. However, there is a tricky choice, considering that Arduino is very popular and easily accessible, but not really suitable for programming in assembly, while 'bare' AVR (custom schematics or existing dev boards) is way less popular and accessible, but allows to unleash the power of the chip.

In general, I think that Arduino has some potential to be used as an entry level modern platform for 1-bit music, to some extent. But for anything serious I'm sure will go with just bare AVR chip.

Funny enough, unlike Arduino, I don't have issues with either ISP or a parallel programmer on the very same PC (but I believe there could be some issue with the USB controller indeed, had issues with a USB sound card).

website - 1bit music - other music - youtube - bandcamp - patreon - twitter (latest news there)

Re: Octode on Arduino

Wouldn't it be possible to link Arduino C code against a pre-compiled library? Then such a library could be written in asm. That was actually what I was intending to do with the Z80 emulation.

Re: Octode on Arduino

I don't know, but even so, I'm afraid it would only complicate things. Like, you would have to compile the library in one tool, then move to Arduino IDE and compile test from there. For end user, it would lack the main quality of the Arduino platform, being able to easily see and modify code. The only benefit of using Arduino that would remain is the on-board USB programming. Maybe there are reasonable use cases for this approach, though.

At the moment I don't really have ideas where to go next with Arduino. Maybe port some other engine(s), maybe explore possibilities with native engines. Sure nothing big that would take large assembly code parts. For 100-200 line pieces inline asm is tolerable.

website - 1bit music - other music - youtube - bandcamp - patreon - twitter (latest news there)

Re: Octode on Arduino

Well, you have a point. I'll think about it more... perhaps write some simple tool that will convert AVRA source to Arduino syntax.

Anyway, I tried compiling arduino_octode, but I was getting some errors. I think it's because I have a very outdated version (1.0.5, thanks Debian) - it doesn't like PROGMEM and NULL. I got it to compile with defining NULL as 0 and PROGMEM as nothing, but that is not the correct way to do it afaik. I should probably replace the Debian version with a newer one, but given that the sources are like 90 MB I'm not too inclined to do it right now, as it would probably take half a day to compile them on my machine.

Anyway, I was able to extract the resulting ELF file and disassemble it. avr-objdump outputs a pretty nice, commented listing, so I'd say give it a try. Or, if you're having problems with it, send me the ELF files (ctrl-f arduino_octode.cpp.elf) and I'll send you back the asm listings.

Re: Octode on Arduino

Yeah, I used the latest IDE, 1.8.1, and I have read that there is inconstince with the PROGMEM between versions.

I don't have problems other than that it takes ages to figure out and find everything. Like finding where the damn ELF file is located, where to get the avr-objdump without installing a pile of unneeded things, etc. I just need time to devote to this instead of more important things. Thanks, I'll try the avr-objdump sometime later.

website - 1bit music - other music - youtube - bandcamp - patreon - twitter (latest news there)

Re: Octode on Arduino

I feel your pain, man. Arduino documentation is good but only as long as you're going to do things their way.

Anyway, dug out my Uno clone today and tried to run Octode, but as expected the ELF compiled with 1.0.5 IDE doesn't work. Could you share your ELF, so I can try to upload it directly?

9 (edited by garvalf 2017-02-12 14:18:03)

Re: Octode on Arduino

@utz you should be able to just download a more recent arduino IDE from the official page. Since it's a java program, it should work anyway. I have several arduino versions in my /opt folder. It's a pity the arduino platform is so inconsistent across the different versions, you often get arduino code on internet you just can't compile any longer because of the slight variations they added to the IDE.

(edit) here is a compiled version anyway, in hex format, you should be able to send it to arduino, I hope (it's not Shiru's original song, it's mine, it was the last compiled project)

@shiru: I love you, honestly I was looking for long for such 1-bit rendering on Arduino, and what you've done is simply perfect. I don't understand everything (I'll read your post several times eventually), but I really enjoy what I'm hearing! (I've just attached an old pc speaker to the pin 7 of my arduino, and the other one to ground)

It worked out of the box on arduino IDE 1.6.7

And I could also upload my own (octode) songs. Very cool smile

Now I'll try to record something and compare it with the zx spectrum version.

Post's attachments

arduino_octode_hex.zip 9.71 kb, 4 downloads since 2017-02-12 

You don't have the permssions to download the attachments of this post.

10 (edited by Shiru 2017-02-12 15:44:05)

Re: Octode on Arduino

Here is the ELF file. I figured out how to find it, the worst thing about it was that the location is different with every build. So every time when you need to analyze the code, you have to manually copy/paste the path from the IDE verbose output. Also found the objdump (had it ony my PC, actually), and was able to see the assembly code, but I'll leave analyzing it and finding possible optimizations for later. At the first glance it seemed pretty effective, sans the tons of push/pops on the interrupt entry/leave.

Please note again, that's not my original song in the example. I can't recall who gave it to me and if he asked to not publish the XM module. So if anyone wants to provide his song to be distributed with this code (with proper credit), it would be cool.

Post's attachments

arduino_octode.ino.elf 112.35 kb, 5 downloads since 2017-02-12 

You don't have the permssions to download the attachments of this post.
website - 1bit music - other music - youtube - bandcamp - patreon - twitter (latest news there)

11 (edited by Shiru 2017-02-12 19:18:53)

Re: Octode on Arduino

Alright, I examined the most CPU time consuming line of the code and possible changes in it, and you know, somehow I chose the most optimal approach intuitively right off the bat. Any changes (trying to change the logic, order of condtion, playing around with temporary local register variables) only make it longer for an opcode or two. Here is the line and the code:

  if(cnt_load[0]) { --cnt_value[0]; if(cnt_value[0]==255) { output_state=SPEAKER_BIT; cnt_value[0]=cnt_load[0]; } }

 1ba:    20 91 08 01     lds    r18, 0x0108    ; 0x800108 <cnt_load>
 1be:    22 23           and    r18, r18
 1c0:    59 f0           breq    .+22         ; 0x1d8 <main+0xb4>
 1c2:    80 91 00 01     lds    r24, 0x0100    ; 0x800100 <_edata>
 1c6:    81 50           subi    r24, 0x01    ; 1
 1c8:    80 93 00 01     sts    0x0100, r24    ; 0x800100 <_edata>
 1cc:    8f 3f           cpi    r24, 0xFF    ; 255
 1ce:    21 f4           brne    .+8          ; 0x1d8 <main+0xb4>
 1d0:    90 93 10 01     sts    0x0110, r25    ; 0x800110 <output_state>
 1d4:    20 93 00 01     sts    0x0100, r18    ; 0x800100 <_edata>

Of course pure assembly code version can be made more efficient, by storing counters directly in registers and checking for carry rather than 0xff, but as for the C appraoch, not much can be improved.

website - 1bit music - other music - youtube - bandcamp - patreon - twitter (latest news there)

12

Re: Octode on Arduino

Alright, sucessfully uploaded garvalf's hex file with avrdude. The ELF doesn't run however, avrdude claims it's not valid. So I guess it's some intermediate thingy that's not meant to be uploaded. Well, no problem for now.

Good to see that the avr-gcc is reasonably efficient. Also, I still think it's very nice that you get annotated output with avr-objdump.

Still not sure if I want to install the latest IDE, especially not alongside the older install. If it were all contained in a standalone Java app then sure, but afaik it installs a ton of other stuff, namely all the avr tools. And I'm afraid checkinstall won't do the trick on this one.

I'm sorry but I don't have any octode demo tunes to offer. Have several snippets laying around but never managed to actually complete a song with it yikes

So, guys, excuse my absolute electronics ignorance, but what would be the most reasonable approach to adding a line-out to this thing? Right now I have a PC speaker attached like garvalf, with some resistor thrown in for good measure.

Re: Octode on Arduino

Well, there are many recommended simplest schematics like this or that, but these designed to work with (the hardware-generated) PWM audio, thus they're basically low pass filters, sometimes with the DC blocking capacitor as well. These should work just fine.

I, however, like to think about it as a 1-bit DAC. Just like Covox, but without the 7 other bits. I.e. a resistor as load, between the Arduino pin and ground, and another one between the pin and audio out (top two resistors on the linked schematics). Plus the optional capacitors to do low pass and DC block, if you will.

website - 1bit music - other music - youtube - bandcamp - patreon - twitter (latest news there)

14 (edited by garvalf 2017-02-12 23:07:12)

Re: Octode on Arduino

Still not sure if I want to install the latest IDE, especially not alongside the older install.

it's completely safe, believe me: there is no installer (at least in the old versions), you just extract the archive where you want, and start it by calling the main script, for example for me: /opt/arduino-1.6.7/arduino
So it won't mess your existing installation.

I've made a recording of my "Rotor" tune, from the arduino, it's presented on my blog there:

http://garvalf.online.fr/index.php?page=blog_2017-02-12

I'd say the drum sounds a bit different (but maybe I'm not using the recommended notes, I don't remember), it's slightly faster (2 sec difference on a 2 minutes tune), and it's also slightly out of tune on some notes (it's less acurate than on original octode). But it's a very good port anyway, I find this very exciting to have this new thing on Arduino!

On this one it's a raw recording with crocodile clips directly from the arduino to the soundcard (the signal is very loud). It might be improved with the low pass filter presented above. I've already made one for an arduino Sid emulator, see the attached pic (the one on the right). I haven't used it on this recording because it's not at my home at the moment...

Also it seems it's possible to use some Octode2k16 or octodeXL tunes, probably with some adjustements. I've uploaded an octodexl, it was ok for most part, but some others were played alone. I'll test further.

Post's attachments

P_20160922_092716.jpg 71.06 kb, file has never been downloaded. 

You don't have the permssions to download the attachments of this post.

Re: Octode on Arduino

The drums expected to be a bit different, as I decided to not recreate the original algorithm and try to add more 'weight' to them. Arduino being faster is because the drums don't affect the tempo anymore, they're completely transparent tempo-wise. Notes being off may be an issue with the Arudino code, need to investigate. Designed to be exact match for the tone channels.

website - 1bit music - other music - youtube - bandcamp - patreon - twitter (latest news there)

Re: Octode on Arduino

just out of curiosity, do you know if it's possible to change the output pin?

#define SPEAKER_BIT           (1<<7)            //PD7 (Uno pin 7)

if I change to something below 7, it works (I can redefine pin 5 or 6 for example), but for pin 9 it doesn't work. I got an error because of "unsigned char output_state", which I changed to "unsigned int" to avoid the error, but it doesn't output sound with
#define SPEAKER_BIT           (1<<9)

(On my arduino set up with the low pass filter, PIN 9 is already soldered to the audio out plug, but I can add a new wire if necessary)

I don't know about the note off, it's not very noticable, but it's a bit like on some engine which get off on some lower or higher notes (I don't think octode on zx spectrum is like this).

We can hear this if we define a sample case with only C-2 and C-4 playing together. Here is a recording: http://picosong.com/GFX8

first it's C-2 + C-4, then C-2 + C-3, then C-2 + C-3 + C-4, then C-1 + C-2. The problem seems to be C4 which detune a bit.

17 (edited by Shiru 2017-02-14 13:11:21)

Re: Octode on Arduino

The SPEAKER_BIT is a bit number in an I/O port, not just board pin number. To move the output to the pin 9, take a look to the Arduino pinout, find out which port and bit the desired pin is connected to (pin 9 is port B bit 1), and change SPEAKER_ defines accordingly. I.e. for pin 9 you need to set it like this:

#define SPEAKER_PORT          PORTB
#define SPEAKER_DDR           DDRB
#define SPEAKER_BIT           (1<<1)

I just needed to have best output performance, thus I avoided the (slower) Arduino functions which operate with the board pin numbers rather than ports/bits.

website - 1bit music - other music - youtube - bandcamp - patreon - twitter (latest news there)

Re: Octode on Arduino

thanks for the link and explanations. Now I understand better the PORT, DDR and Bit parts of the code. It works perfectly this way.

19 (edited by garvalf 2017-02-19 10:53:05)

Re: Octode on Arduino

I've looked further about the detuning.
I don't know much about this and how it works, but while looking for OCR2A, I found this table:

http://cdn.makezine.com/make/35/OCR2A-f … -table.pdf
(from http://makezine.com/projects/make-35/ad … ynthesis/) (they even talk about 1-bit DAC)

They suppose this:

C3 = 60
C4 = 30
C5 = 15

(I think it's rather C2, C3 and C4 instead but anyway...)

while the current code use this instead: 61, 30 and 18 for C.

I've tried to replace in my sample test 15 instead of 18 and it sounds different, I can't really tell if it's better or not (it's only through a pc speaker), but it's not worse as a unison.

I still think 61, 30 and 18 are more accurate (in decimal it would be 97, 48 and 24 and 24*4 is 96), but I don't know, maybe there is something else to take into account.

20 (edited by chupo_cro 2017-07-28 03:20:01)

Re: Octode on Arduino

Shiru wrote:

Song data parsing and playing happens in the main thread. Once a row is parsed, player sets the sync counter to the speed value, counted in sample rate units. Then it just waits until the interrupt handler will decrement it down to zero, and next row gets processed. One major weird issue I had was related to this part. Initially I waited for the counter to be zero with just while(counter);. This caused major tempo fluctuations, with both speed increase and decrease. Once I changed it to while(counter) delay(1); it started to work, although the 1 ms delay may change the tempo a bit. Still not figured why the original approach didn't work as expected.

Hi, I have downloaded and examined your Phaser1 engine for Arduino where there is the same issue you described:

// delay 1 is important, by some reason sng tempo starts to jump a lot without it
while(parser_sync>0)
    _delay_ms(1);

The reason why this doesn't work is because reading the parser_sync variable in a while loop might look something like:

loop    lds       r24,0x0114
        lds       r25,0x0115
        or        r24,r25
        brne      loop

The problem is because when the interrupt happens in between the two lds instructions and since the loop is very fast it happens quite often. For example if parser_sync is 0x0100 and the interrupt happens after the first lds instruction r24 is going to be 0x00. Inside the interrupt routine the value stored in locations 0x0114 (low byte) and 0x0115 (high byte) will change to 0x00ff and upon returning from the interrupt routine the second lds will fetch the value 0x00 effectively reading the variable as 0x0000 instead as 0x00ff. Similarly the variable might 'jump' from 0x0b00 to 0x0a00 instead to 0x0aff etc. and because during the while loop there are many interrupts the error quickly accumulates. When you added the 1 ms delay you considerably slowed down the while loop - lowered the frequency of the lds instructions (because now the loop spends most of the time in the delay loop) so the error happens only sporadically. It is similar to as when you are drawing the sprite into the Spectrum's video RAM and the electron beam 'runs' over the location where you are changing the bytes :-)

Similarly, the line:

parser_sync=MUSIC_FRAME*tag;  //wait for given number of tempo units before playing next row

might look something like:

        ldd       r24,y+1
        mov       r11,r24
        lsl       r11
        lsl       r11
        lsl       r11
        clr       r10
        sts       0x0115,r11
        sts       0x0114,r10

where everything goes wrong if the interrupt happens after the first sts. In that case the high byte of the variable would inside interrupt routine be decreased by one (because the lower byte is still zero), the lower byte would become 0xff but it would be overwritten immediately upon returning from the interrupt by the second sts. This is in fact the actual code generated by the compiler, high byte is stored the first which is worse.

The solution is - you must not allow the interrupt to happen in between load or store instructions which are accesing or writing the variable which takes more than one byte. Here is one way how that could be done:

unsigned int p_sync;
do {
   cli();
   p_sync = parser_sync;
   sei();
} while (p_sync);

and

cli();
parser_sync=MUSIC_FRAME*tag;  // wait for given number of tempo units before playing next row
sei();

Despite parser_sync variable is volatile, that isn't enough. Declaring the variable volatile only prevents the compiler to store that variable in registers because in that case the interrupt routine would modify the registers after push instructions and at the end of the interrupt routine the pop instructions would destroy all the changes.

The other solution (which I used more often than cli/sei one) is to use one byte flag to signal from the main program to the interrupt routine and/or from the interrupt routine to the main program when the data is ready to read (or when the while loop should end). In that case you might declare a flag:

uint8_t    sync_over;

which would send a signal from the interrupt routine when parser_sync counter is zero - and then you can use:

while(!sync_over)
    ;

Similarly you can in the main program load the new counter value in some temporary variable and then use another flag to signal the interrupt routine to read the value and to update the real counter.

I have BTW modified your code to run on ATmega328 and on ATmega128 because I don't have an Arduino. I can see you are looking for the best way to debug the C code by stepping through assembler instructions generated by the compiler. I will describe you in one of my next posts what I think is the best approach. In short - AVR Studio 4.18 (not Atmel Studio!! and not the latest AVR Studio) + $8 ATmega128 PCB with JTAG connector + $7 USB JTAG ICE. That way you can debug the code both in the real hardware (using hardware breakpoints) almost for free - at least compared to newer and 'better' options :-) and in the simulator where you can count cycles and time. Since you didn't use any C++ code it took me just 10 minutes to modify Arduino code for using with the AVR Studio meaning you can, after debugging with ATmega128 board, change the code to work on Arduino in minutes.

And one more thing, I did a 2 channel 1-bit sound routine (using PWM and waveform tables) with portamento and decay envelope which runs on ATmega8 with 8 MHz internal oscillator and the results are quite good, some of the sounds could be compared with low end keyboards. Not to say what could be done with 8 pin ATtiny85 which has 64 MHz (yes, megahertz :-) ) PLL clock and can generate 250 kHz PWM output.

Chupo_cro

21

Re: Octode on Arduino

Now that's what I call an introductory post wink Welcome to the 1-bit forum, and thanks for all the info.

chupo_cro wrote:

And one more thing, I did a 2 channel 1-bit sound routine (using PWM and waveform tables) with portamento and decay envelope which runs on ATmega 8 with 8 MHz internal oscillator and the results are quite good, some of the sounds could be compared with low end keyboards.

Sound example or it didn't happen xD

Re: Octode on Arduino

Thanks for explaination of the issue.

As for looking up to the generated code, I have my doubts about these ideas. First, I just need to see what compiler spits out, in order to see how efficiently certain C code compiles with certain C compiler. That's purely software issue, normally you don't even have to do anything to just get the intermediate assembly output. Using simulators, switching platforms, using JTAG or any extra HW is all total overkill for this. Also, I doubt that latest Arduino and AVR Studio 4.18 use the same exact C compiler with same exact options, and if this is not the case, it just won't help at all.

I have no doubts that a lot more can be pulled off with Arduino or plain AVR. Something along the lines of Casio CZ series or Korg Poly 800 (with external filter) should be totally doable. We here not trying to squeeze out all that is possible, we're just playing with concepts of porting over ZX beeper engines, with all their quirks and specifics, and maybe applying some of this experience to do like 'super' versions of those engines. And using Arduino over plain AVR is an important feature, because that's certainly more accessible platform for strangers and newcomers.

website - 1bit music - other music - youtube - bandcamp - patreon - twitter (latest news there)

23 (edited by chupo_cro 2017-07-27 18:54:33)

Re: Octode on Arduino

utz wrote:

Now that's what I call an introductory post wink Welcome to the 1-bit forum, and thanks for all the info.

Thank you very much for your kind words!

utz wrote:

Sound example or it didn't happen xD

:-) I will post the source code and a sound example once I translate the comments into the English language. And since the routine could easily be expanded for more channels and/or effects (reverb, vibrato, ...) I might first add some more code to spend some more cycles that are available.

I used 8000000/510 = 15686.27 Hz PWM frequency meaning there is 63.75 µs of time to spend inside the interrupt routine. 1 channel with portamento took only 8 µs of processing time but when I added the decay envelope code (which was straightforward and not optimized) the processing time exceeded 63.75 µs. However, after optimizing the code 1 channel + portamento + decay took only 12 µs. After I added one more channel the time increased to only 19 µs so there are still plenty of cycles that could be used. I think I spent about 10 more µs after adding some more commands (decay on/off, waveform change, ...) but everything could be further optimized and I believe more than 10 high quality channels could be done even with ATmega µC running on 8 MHz internal oscillator. Since Arduino works with 16 MHz clock (external crystal oscillator), the available number of cycles to spend in the interrupt routine is twice more than I had when using ATmega8 without a crystal.

Something that might be interesting - my song data format is not tracker-like (patterns of tones/commands) but is rather an array of tone[|CMD], duration[,command][, parameter] per channel (array of uint8_t) so it is quite easy to enter the song by looking at the musical scores and typing the data. Some commands can be specified just by OR-ing the tone with the command and some need to be specified by using CMD flag and the additional byte as command specifier and maybe one more byte as a parameter. The durations are specified as t1 (a whole note), t2 (a half note), t4 (a quarter note), t8, t16 or as the combination - for example t4+t8 is a quarter note with the dot.

However, I am much more excited by Spectrum's sound routines which I think are the state of the art. I still have Konami's/Imagine's sound routine from Ping Pong start screen written on paper from back in the 80s when I spent quite a few months analysing how it works.

Best Regards

Chupo_cro

Re: Octode on Arduino

Shiru wrote:

Thanks for explaination of the issue.

As for looking up to the generated code, I have my doubts about these ideas. First, I just need to see what compiler spits out, in order to see how efficiently certain C code compiles with certain C compiler. That's purely software issue, normally you don't even have to do anything to just get the intermediate assembly output. Using simulators, switching platforms, using JTAG or any extra HW is all total overkill for this. Also, I doubt that latest Arduino and AVR Studio 4.18 use the same exact C compiler with same exact options, and if this is not the case, it just won't help at all.

I have no doubts that a lot more can be pulled off with Arduino or plain AVR. Something along the lines of Casio CZ series or Korg Poly 800 (with external filter) should be totally doable. We here not trying to squeeze out all that is possible, we're just playing with concepts of porting over ZX beeper engines, with all their quirks and specifics, and maybe applying some of this experience to do like 'super' versions of those engines. And using Arduino over plain AVR is an important feature, because that's certainly more accessible platform for strangers and newcomers.

Yes, I am aware the primary goal is to port the Spectrum's sound engines to Arduino. I agree JTAG might be an overkill but when I saw $7 Chineese JTAG ICEs that connect to USB port I just had to buy one to see how/if it works - despite I most of the time use just five wires as a 'programmer'.

While code generated by Arduino IDE and old AVR Studio is not the same, the compiler is - in both cases avr-gcc is used to compile the code (although in Arduino you can use C++ in addition to C). One of the reasons why I said it is better to use an old AVR studio than new Atmel Studio is because old compiler produces smaller and mostly faster code. Despite Arduino beeing a target platform it is much easier to develop/debug the routines using old AVR Studio (good simulator, disassembler and cheap in circuit debugger) and to make just a few small modifications to move the code to Arduino IDE when everything works as expected. When I modified your Phaser1 code to work with bare metal ATmegax, I just had to remove loop() and move the code to main(), insert a call to setup(), get rid of boolean, insert a few #includes and make cast from pointer to int. The other way would be as easy too. Then, if you noticed that Arduino's compiler produced worse code than old avr-gcc, you could just insert a few lines of inline assembler. But 16 MHz AVR with just 1-5 cycle instructions is fast enough so I don't think there would be a need for assembly optimizations.

But still, fast and precise count of the cycles between two instructions is something that should be available at all the times. For that you might use a simulator which is part of the AVR Studio, or an oscilloscope (toggle the pin upon entering and before leaving the interrupt routine) or use Proteus vith virtual oscilloscope.

Although I don't have Arduino I do use Arduino IDE to write code for ESP8266 so I was examining the Arduino sources. That way I know Arduino is using Timer0 to do some things, the Timer0 is used by delay(), millis(), micros() etc. I might be wrong but I believe the sound generation routines might work better if Timer0 interrupt would be disabled (unless not used by the sound routine itself). In that case the delay() wouldn't work but you can #include <util/delay.h> and use _delay_ms() which does not use interrupts. Although I don't think the delay needs to be used in a sound generation routine.

Chupo_cro

25 (edited by Shiru 2017-07-27 20:23:31)

Re: Octode on Arduino

Proteus that costs like $1000 is certainly an overkill for this.

For this particular application I didn't need to know exact cycle count or do assembly optimization. If I was to write AVR assembly code by hand, I sure would know how many cycles it takes - it is common practice to memorize opcode cycles (super easy on AVR), and count them in time critical parts when writing for 8/16 bit systems in assembler.

What I needed was just to see compiler generated code, to check if particular changes in C code makes resulting code longer or shorter, which is totally enough to estimate efficiency of edits - another common practice when writing for 8/16 bit systems in C. It is super simple task, I don't see why it should be overcomplicated like that with all that porting to other environments, using simulators, debuggers, and stuff like that. All it really takes is just a quick glance at the compiler output, which is normally fully exposed to the user. It is just an Arduino IDE's quirk that it hides the intermediate assembly.

website - 1bit music - other music - youtube - bandcamp - patreon - twitter (latest news there)